
Here are the four sample blocks I made, that I'll use for this tutorial:

I'll start with the girl block, and provide the most directions for that one. Once you get the hang of the piecing, you'll see how easy it is to vary it with different shapes and details.

It helps to start in the center of the block and work out. If it matters to you what size the blocks will be in the end, you might want to draw out the basic shapes and pre-determine the size of each. In this case, I wanted random sized blocks, so I just let it grow as I went. This finished block was fairly large - about 11" x 15". I picked a purple Kaffe Fassett floral for the skirt, and a lighter pink pattern for the block background. I cut rectangle of each - in this case, they were about 9" x 7". A small girl might require starting with a 3"x5" piece, or anywhere in between.

Locate the vertical center of your girl fabric. Take the right-side background piece and place it face-down on the girl fabric (right sides together). Make a random angled cut, making sure you are leaving enough at the top so the fabric doesn't go to a point in the middle.

Now place the left-side background fabric right-sides together with the girl fabric, and repeat the angle on the left side. If you are aiming for a little wonky, it doesn't have to be the same angle as the other side - that's up to you. Make the cut.

What you have now looks something like this. Here's where I found it confusing, as your goal is to end up with a rectangle section when this is pieced. You need to now flip-flop the two background fabrics with each other, and turn them 180 degrees.

Here is what the right side looks like when ready to sew.

Now here is the left side ready to sew, with the right side already completed.

Here, the center body is complete. The body could have been wider, narrower, or the skirt straighter instead of flared, just vary how the pieces are cut to get different effects. Now it's time to add some arms and sleeved. In the picture above, I decided on the arm length and realized I didn't have enough fabric, so I just cut and pieced together two scraps. This block has a scrappy look to it, so piecing wherever you need to is fine. I added some cream solid fabric for the hands. In this case, the hands extend all the way to the seam allowance, so be sure to plan for that. If you want the hands to end prior to the block edge, just add a piece of background fabric on either end after the hand pieces, and plan the arm length accordingly.

In this picture, I've pieced the sleeve and hand sections, and sewed them to the skirt section. Notice that the edges aren't exactly matching up, but that's OK because I'll square the whole thing up later. That way, you can just pick up and use scraps of different sizes and trim it later. I've also placed the head and background pieces for the next step. For this large girl, I cut a 2.5"x2.5" piece, so obviously with a smaller person you'll start with less. You don't want her to have a pin-head, though, so remember that you need to cut it and allow for the seam allowance on all sides!

Now, it is clear that she needs a hat of some sort, so I picked out a dark pink fabric. The head row has already been assembled here, and has been sewn to the sleeve row. Before I sewed this together, a realized that her arms looked a little too big, so I cut the sleeve row shorter prior to sewing on the head row. Just hold the pieces up as you go to make sure the proportions are working, and trim accordingly. Now, what to do about a hat shape?
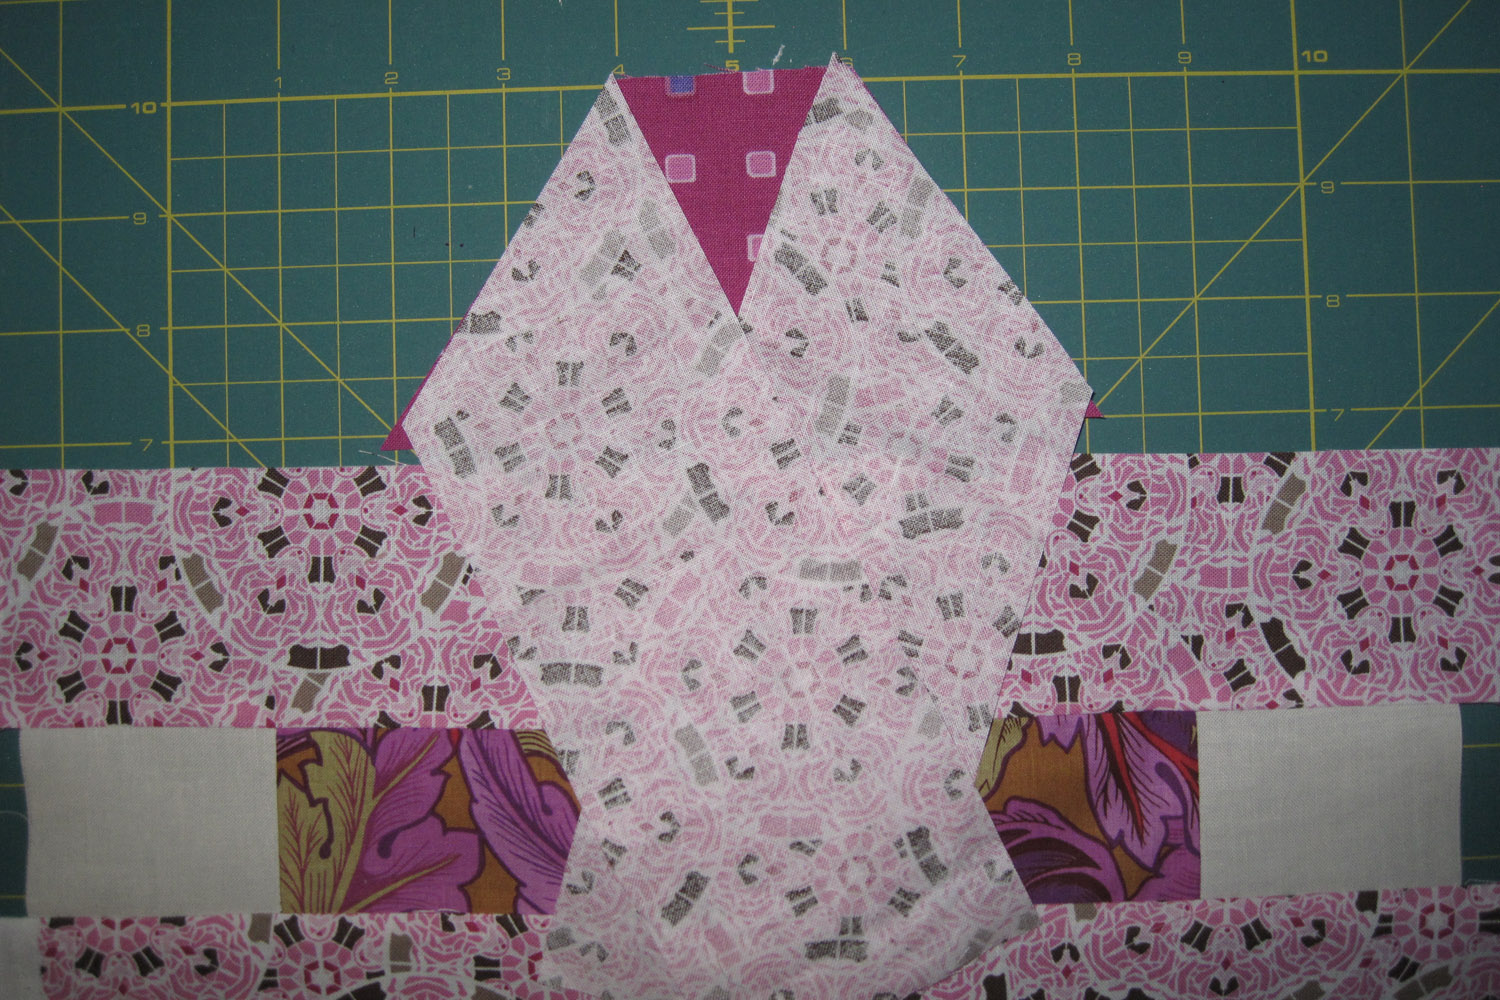
I decided to make an angled hat, so I used the same technique I used for the skirt piece, cutting each side angle with right sides of the fabric together, then flipping the side background pieces so that they would form a rectangular row. This shows the hat piece cut, and the side pieces ready to seam.

Here, the hat section has been pieced. I realize that her hat might be a little big, but since it is the top of the block and includes the seam allowance, I'll take care of that later when I square up the block. I then sewed the hat row onto the body.

Now she needs some legs. I chose some brown patterned fabric for leggings for her. Here I cut them about 1 1/2" including seam allowance, and that's for a 15" tall block. Any smaller, and you definitely want the legs to be thinner, or she'll look stumpy.

Here she is! All trimmed up and ready to go. I might add some little buttons or a bow for her hat later, but for now she's done.
Now wasn't that simple? The basic idea of these blocks is to piece them in sections that can be divided up into rectangles for easy piecing. You might want to add another row for some shoes, maybe another one above her head with something flying by in the sky, or perhaps piece her arm so she is waving. Lots of possibilities.
A boy block is just a variation of the girl block. I'll just show a few steps here, to give you the idea.

For this block, I chose blue for the background, and chose an Amy Butler brown print for the boy's pants. Here, I am laying out the top part of the pants, and the legs with the background in between. The finished block is 10"x11", and for that I cut the top pants piece at 4" wide, the legs at 2" wide, and the blue piece at 1" wide. Just be sure to leave enough extra in length and width that you can hold the pieces up to each other as you go, and then cut it smaller if necessary.

I've combined a few steps in this picture. You can see the pants have been pieced. I then added a section for the bottom part of his shirt, just a little wider than the pants, and have pieced the arm section.

The head piece is the same as on the girl block. I changed the hat up some, by adding a sideways brim for a baseball-type hat.

Here he is, all pieced and ready for trimming!

Here they are together, so you can see the size difference. The boy is 11"x10", the girl is 11"x15". It seemed that they grew as I made them, so if you are aiming for a smaller block be sure you start with a small center or leg section!
OK, now for the basic house block. There are lots of ways to change this up, so think of all the ways you could personalize yours. I started with the basic house block from my inspiration quilt in Material Obsession.

This represents the main components of the house. I picked out a lighter blue print for the background (which you can't see yet), so I used a hot pink for the house for some contrast. The door is a fun Laura Gunn print, and for the windows I used some pictures of outdoor lounging and gardening - some of my favorite pastimes when I'm not sewing - that I had in some Japanese prints. The windows or doors could be any size.

Here, the main part of the house has been pieced. I've added the light blue print for the background on the sides of the house. For the roof, I picked out a dark brown with blue dots - I like the roof to be darker than the house, but you may have different ideas for yours. I wanted this room to have angled sides, so here it shows me getting ready to cut the angle just like a did earlier for the girl block's skirt, using more pieces of the background fabric.

And here is the roof after cutting both angled sides, before I switched the pieces around to make the roof seams form a rectangle piece with the background.

And here is the roof piece, ready to go! I decided to make this house a little wonky, so I sewed the house sides at an angle to the background, and the roof was also placed at an angle.

The final section is the grass. Rather than just doing a solid piece, I decided to include a pair of dachshunds in the front yard, in honor Roscoe the dachshund who visits our house often. You can see those pieces ready to assemble.

The final block, trimmed and on the wonky side - this one is 10.5" x 12.5".
Having conquered the basic house, I took a stab at changing it up some with my second house block. I decided this one would have a garage as well.

This shows a basic house block already assembled. It's a light pink house to go with a bright turquiose dotted background pattern. For this house the windows are showing cups and saucers, since having coffee in the morning is one of my favorite things. I am ready to assemble the roof piece here. Next to the house is the garage section already pieced.

You'll notice here that I didn't remember that the background strips for the roof needed to be long, not small like I made them, so I just pieced additional background to the smaller sections. For the background on the side of the house, I pieced in a Japanese print that shows someone walking in with a flower from the garden.

Here is the final block, trimmed and squared up, about 16.5" x 10".
As you can see, there is no end to the variations of these blocks. You might find it helpful to draw out your idea on some scratch paper to make sure you have identified the sections and how they will go together, or feel free to just wing it and see what happens!
Thanks for the thorough tutorial! Can we put more than one person in one block?
ReplyDeleteReally like these and appear to be a lot easier than they at first seem.
ReplyDeleteOhhhhh yippee I've always wanted to try doing houses and now I get to 'especially for you'
ReplyDeleteBookMarking the tutorial now - do we get to add in our own scraps if needed?
Cat
This is going to be a wonderful quilt.. although I am freaking slightly at the blocks... (but I am sure it will be ok...). Thanks for the excellent tutorial, I will be following that!
ReplyDeleteThis is a great tutorial. I haven't really been sure how best to go about doing this kind of thing but it makes complete sense now. I think I'm going to have to concentrate to manage any wonkiness - seems funny that wonky is harder than not, but I'm sure that'll be the case for me.
ReplyDeleteThanks so much. Julie
Hi, I am participating in a different quilting bee and had been thinking of asking for "Burbs" inspired blocks - do you mind if I use your tutorial if I do choose that theme for my month???
ReplyDelete